
Image source [2]
“When you cannot reach an important goal, keep the goal but change your strategy.”
– Chinese proverb
Restorative yoga poses are meant to calm the central nervous system (CNS) down and allow the mind and the body to relax into each pose for extended periods of time. Be mindful of entering into each pose and slowly transitioning into a restful savasana / child’s pose or a restorative side lying position with a pillow supporting your neck to allow your nervous system to adjust to the physical changes from each pose. Most importantly listen to your body and if for some reason you aren’t comfortable in a specific pose gently move into a different pose that works best for you and your body.
Health Benefits [2, 3, 4, 5]
- inversion poses bring the head below the heart and the lower extremities above it shifting our perception in space
- lowered blood pressure
- lowered heart rate
- improved circulation throughout the body
- release of endorphin hormones from the brain
- deep relaxation and calmness from within stimulating the parasympathetic nervous system (PNS) from the autonomic nervous system (ANS)
Props Needed:
- towel or yoga blanket folded to support your neck
- yoga block (e.g. cork, foam or wooden)
- yoga bolster or 3 or 4 yoga blankets folded and stacked ontop of eachother (note the thickness of each blanket)
- yoga mat (optional)
- chair (optional)
Purpose
- passively stretching the hip extensors (gluteus maximus and the hamstrings specifically the long head of the biceps femoris, the semitendinosus, and the semimembranosus)
- nice alternative for students with any cervical spine problems who do not wish to practice headstands or shoulder stands
Precautions/Contraindications [2, 3, 4, 5]
- do not perform poses or movements that cause pain or discomfort
- pregnant beyond the first trimester
- glaucoma or other eye disorders
- currently taking any blood pressure medications
- history of stroke or heart disease
- diabetes
- spinal problems
- chronic neck pain
- excessive weight
- head injuries
- inner ear issues
- hiatus hernias
- feeling faint or dizzy
- osteoporosis / osteopenia *
*modification can be a safe option for some talk with teacher before trying
Innervation & Chakra Illuminated
- vagus nerve helps to regulate our nervous system
- third chakra related to central or solar plexus, digestive organs, muscles, immune system and nervous system.

Setup with Wall
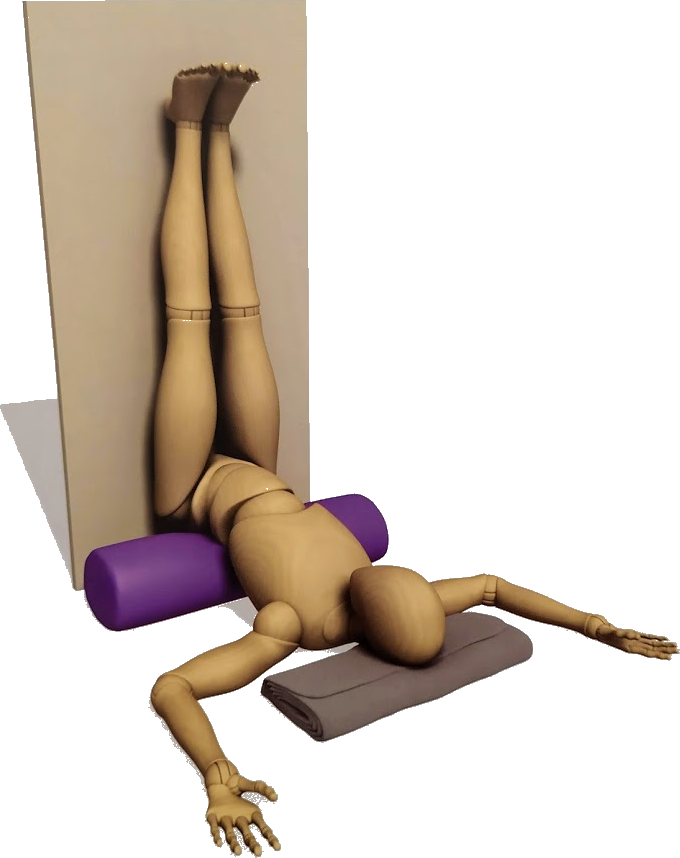
Image source [2]
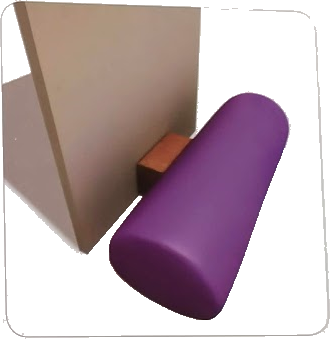
Image source [2]
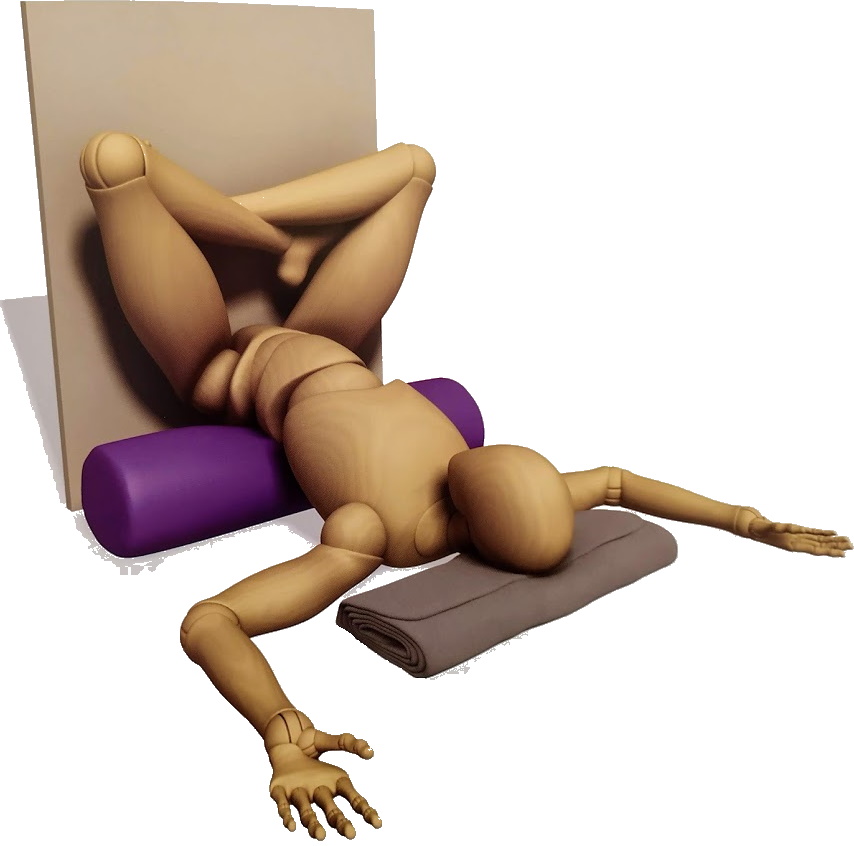
Image source [2]
- Start in a comfortable seated position or siddhasana pose with your eyes closed.
- Tune into your breath and how your body is feeling. On the next inhalation through your nose allow your ribs to expand like an accordion. On the exhalation allow your body to soften into the floor allowing the air out through your nose or mouth. Repeat this cycle for at least 5 to 10 rounds taking this time to scan your body for any tension allowing your body to release the tension from your body on each exhalation.
- Place a bolster against the wall. You can put a block between the wall and the bolster to better position the pelvis so that the body does not slide off.
- Place a folded blanket underneath your head for additional support if resting on hard floor surface.
- Allow the arms to fall out to the side of the body in a comfortable restful position with your palms up.
- Close your eyes and relax here for several minutes (3 to 10 minutes) each time allowing yourself to go deeper into the pose.
- When you’re ready to come out of this pose, slide off the bolster, roll to the right and rest in the fetal position keeping your eyes closed before returning to a comfortable seated position or siddhasana pose. Take 5 more even inhalations and exhalations scanning your body.
- Tune into your body. What do you notice from this pose? How this has pose allowed things to shift and settle within your body?
Modified Setup with Chair

Image source [2]
- Start in a comfortable seated position or siddhasana pose with your eyes closed.
- Tune into your breath and how your body is feeling. On the next inhalation through your nose allow your ribs to expand like an accordion. On the exhalation allow your body to soften into the floor allowing the air out through your nose or mouth. Repeat this cycle for at least 5 to 10 rounds taking this time to scan your body for any tension allowing your body to release the tension from your body on each exhalation.
- Place a chair on the yoga mat or floor making sure it won’t slip.
- Come into a supine position and place your calf muscles (lower legs) on the chair. Allow your legs to be hip width apart or wider. Notice if you shift your body closer to the chair or further away which position feels the most comfortable for your back. Find a position that works best for you and your body.
- Place a folded blanket underneath your head for additional support if resting on hard floor surface.
- Allow the arms to fall out to the side of the body in a comfortable restful position with your palms up.
- Close your eyes and relax here for several minutes (3 to 10 minutes) each time allowing yourself to go deeper into the pose.
- When you’re ready to come out of this pose, slide off the bolster, roll to the right and rest in the fetal position keeping your eyes closed before returning to a comfortable seated position or siddhasana pose. Take 5 more even inhalations and exhalations scanning your body.
- Tune into your body. What do you notice from this pose? How this has pose allowed things to shift and settle within your body?
This is just one of the restorative yoga poses we suggest trying on your own. We have additional blog post specific to pilates, pre/post natal, bone building for osteoporosis/osteopenia, mindful meditation, restorative yoga therapy, partner and endurance training. We believe in treating the whole person with a holistic approach and blend our knowledge and training of movement, nutrition, massage therapy and traditional chinese medicine.
We love teaching mindful movement and are here to support you in your journey. We offer customized online remote training from anywhere in the world. Contact us today to get started and learn to move with less pain and greater ease. We look forward to partnering with you and answering your movement questions and/or concerns.
Assumption of the Risk: By attempting any of the exercises, you do so at your own risk. We make no representations, guarantees or warranties that the information or exercises on this blog are appropriate for you or will result in improvements of your medical condition or function.
Not medical advice or physical therapy. This content is intended to provide information and instructions on general exercises that may help increase strength, mobility, and function for specific areas of the body. It is not intended to be a substitute for obtaining a medical diagnosis or medical or physical therapy advice from a qualified licensed provider. You should seek medical advice from a qualified physician or physical therapist before trying any of the exercises or self-treatment suggestions on this blog, particularly if your pain is from a traumatic injury or event.
References
- DALE, C., 2009. The Subtle Body An Encyclopedia of Your Energetic Anatomy. Boulder, CO: Sounds True, Inc.
- LONG, R., 2020. Anatomy of Arm Balances and Inversions. Plattsburgh, NY: Bandha Yoga Publisher.
- LONG, R., 2010a. Anatomy for Backbends and Twists. Plattsburgh, NY: Bandha Yoga Publisher.
- LONG, R., 2010b. Anatomy for Hip Openers and Forward Bends. Plattsburgh, NY: Bandha Yoga Publisher.
- LONG, R., 2010c. Anatomy for Vinyasa Flow and Standing Poses . Plattsburgh, NY: Bandha Yoga Publications.